How to Use Power Automate to Export Data from FSCM to SharePoint
by Ahmed Eid, Lead Developer D365 Solutions at Bluefort
Imagine a finance manager, overwhelmed by the daily task of manually exporting critical data from Microsoft Dynamics 365 FSCM to SharePoint, finally reclaiming hours of productivity. Or picture a sales operations manager who needs to export and share sales orders daily with the fulfilment team, constantly battling time-consuming processes that leave room for errors.
This guide reveals how you can achieve the same transformation they did by building a Power Automate flow that seamlessly handles these processes for you. Whether you’re managing monthly financial reports, automating the export of sales orders to streamline operations, or ensuring real-time updates for stakeholders, automating data export to SharePoint can save time, reduce errors, and boost efficiency across your organization.
In this article we are going to demonstrate an example of exporting sales orders, you can define the entities that you want to export in the export package.
Step 1: Set Up Export in FSCM
- Create/Identify a Data Entity: identify or create the data entity in FSCM that holds the information you want to export. Ensure the entity is available for O-Data access.
- Enable Data Management Framework: navigate to the Data management workspace in F&O and ensure your data entity is enabled for export.
- Data Export project: create data export project. You can configure this to run full or incremental.
Step 2: Create a Power Automate Flow
Now, use Power Automate to retrieve the exported file and save it to SharePoint.
- Log in to Power Automate: go to Power Automate and sign in with your credentials.
- Create a New Flow:
- Click on Create and select Automated Cloud Flow.
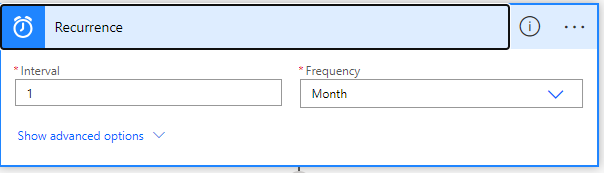
- Name your flow (e.g., ” Export data D365FO “) and select a trigger. For this scenario, you can use the Schedule – Recurrence trigger to automate the process on a set schedule.

- Add an Action to export the package:
- Add the action Fin & Ops Export package action.
- Configure it to export the export project created in the earlier step, specifying the instance, definition group (project name), action as specified and the legal entity.
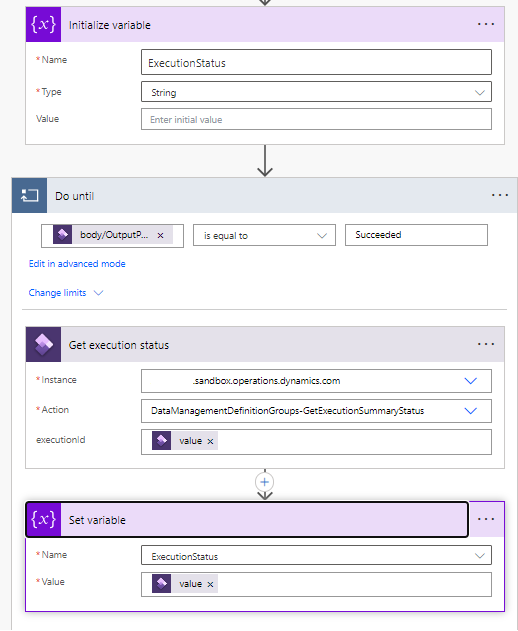
- Get the execution status of the export project:
- Initialize a Variable to hold the export project status named Execution status.
- Add Do Until action to keep looping till the status turns to succeeded.
- Add Fin and Ops action to get the package execution summary, this needs the Execution Id passed from the output of the earlier step of exporting the package. The action is named GetExecutionSummaryStatus.
- Add a step to set the created variable with the previous action output.
- Once the export package execution is over in Fin and Ops, this will end the loop giving the green line to go to the next steps.
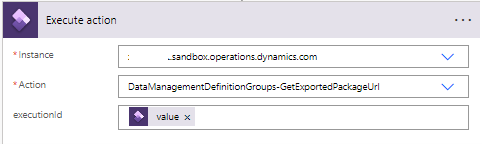
- Add Fin & Ops action to get the export URL:
- Add actions and choose GetExportedPackageURL action and specify the execution Id.
- Add actions and choose GetExportedPackageURL action and specify the execution Id.
- Add an Action to Save to SharePoint:
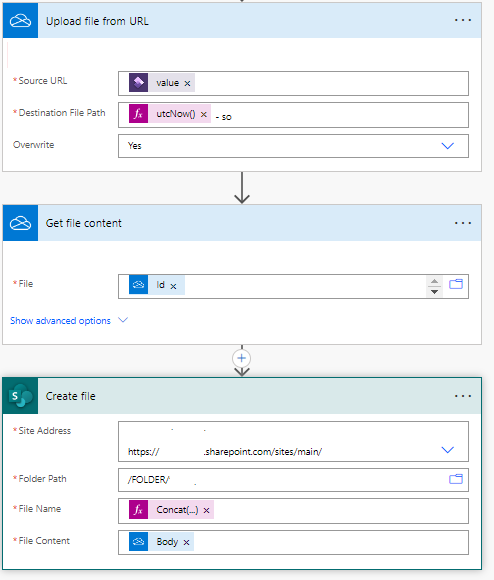
- Add the action Upload file from URL, specify the source as the output of the previous step, the destination file path is the file name, and you can choose either to overwrite the file if exists or no.
- Configure Get File content to get the content from the previous step specifying the File Id which is found from the previous step output.
- Use Create file on SharePoint action to create the file from the contents of the previous step. specify the SharePoint site address, Folder to use to save the file, file name and file content.
- Optional – Notify Stakeholders:
- Add an action to send an email or Teams notification to stakeholders once the file has been successfully saved to SharePoint.

Step 3: Test and Validate the Flow
- Run a Test: Manually trigger the flow or wait for the scheduled trigger to run. Ensure the file is exported from F&O and saved to SharePoint.
- Validate the Output: Check the SharePoint library to confirm the file is saved correctly. Verify the file content matches your expectations.
Tips for Optimization
- Error Handling: don’t let failed exports catch you off guard! Build in condition checks and error-handling steps to ensure your flow gracefully navigates hiccups and keeps things running smoothly
- Dynamic File Names: use expressions to create dynamic file names based on the date or other parameters.
- Security: don’t let failed exports catch you off guard! Build in condition checks and error-handling steps to ensure your flow gracefully navigates hiccups and keeps things running smoothly
Conclusion
Transform the way you manage data with the power of automation. By combining Microsoft Dynamics 365 FSCM with Power Automate, you can eliminate manual processes, reduce errors, and boost efficiency. Imagine never worrying about missed exports or data delays again! Your automated flow takes care of it all, from exporting sales orders to delivering timely updates to your SharePoint library.
Why wait to level up your operations? Start creating your Power Automate flow today and experience the freedom to focus on what truly matters: making strategic decisions, driving growth, and empowering your team. The future of streamlined data management is just a few clicks away!
Let’s chat further.
"*" indicates required fields

